


GUIDE TO DIY SCREEN PRINTING ON TOTE BAGS AT HOME
Whether you're shopping for blank bags, premium apparel, stylish hats, bulk quantities, or fully customized printing and embroidery, BagzDepot delivers fast, affordable, and high-quality solutions — trusted by 200,000+ customers nationwide.
Request a Custom Quote →Learning how to screen print at home is a fantastic way to push your DIY fashion skills to a new level or even add to your repertoire of home craft options as an Etsy seller or home business.
Silkscreen printing is a fantastic way to turn wholesale tote bags into beautiful designs that are worthy of going on Amazon or even your own custom store.
Whether you’re an at-home craft enthusiast that wants to learn how to do DIY screen printing or fashion brand owner that wants to take t-shirt production into their own hands, learning how to DIY screen print is an essential skill.
Continue ReadingGuide to DIY Screen Printing on Tote Bags at Home
Learning how to screen print at home is a fantastic way to push your DIY fashion skills to a new level or even add to your repertoire of home craft options as an Etsy seller or home business. Silkscreen printing is a fantastic way to turn wholesale tote bags into beautiful designs that are worthy of going on Amazon or even your own custom store.
Whether you’re an at-home craft enthusiast that wants to learn how to do DIY screen printing or fashion brand owner that wants to take t-shirt production into their own hands, learning how to DIY screen print is an essential skill.
Screen Printing at Home
Silkscreen printing is a technique that involves pushing ink through a screen and stencil mesh, printing the design onto blank tote bags, blank t-shirts or even reusable bags. Whatever item you want to design, silkscreen printing can be a fantastic way to mass-produce your products or designs at home. However, it does take a bit of setup and there are a couple of considerations to keep in mind.
For starters, what type of products do you plan to create at home? If you’re just doing a few simple designs, such as custom shopping bags or canvas tote bags, then you may be able to use pre-made stencils and designs. However, if you’re going for a fully-customized look for your products, then creating your own frames and stencils is a great option.
So below, we’re going to explain the steps involved in how you can start screen printing at home.
DIY Screen Printing at Home
First thing’s first; here are the products you’ll need to get started with screen printing at home:
- A screen and frame which can be purchased online or at a local art store
- A strong light bulb (250-watts or more)
- A dark room such as a large closet or bathroom with no windows
- Photo emulsion and sensitizer
- Latex gloves to protect your skin
- Wholesale t-shirts, shopping bags or whatever product you plan to print on
- A squeegee
- Silkscreen fabric inks
- If you’re printing on a shirt, then you need a piece of cardboard that will be used to prevent ink from leaking onto both sides of the shirt
- A printer and some transparency paper (optional)
With that out of the way, here are the simple steps to help you customize cheap tote bags, duffle bags, t-shirts and a variety of other products.
- Create Your Design
A good place to start is looking at inspiration. You’ll want to create something digitally with computer software and make it with a simple, bold and black design. Screen printing at home is usually restricted to a single color unless more advanced techniques are used, but for the sake of simplicity, we’ll only be covering single-color DIY screen printing in this article. The image needs to be a solid black because it will be blocking out light to create the screen that we’ll be using. You can either print the design on transparency paper or get a transparent photocopy at a store.
- Coating the Screen
Next, you’ll want to coat your screen in the emulsion. This involves mixing a sensitizer with the emulsion to create a liquid that will be poured and spread across the screen. Make sure you do this with a layer underneath to protect the surface you’re doing this on. You can also use the squeegee to spread the emulsion, but do remember to clean it if you’re going to use it later for the screen printing process. You may need to repeat this process in order to get a thin and uniform layer across the entire screen.
Once the screen has been coated, you can leave it in a pitch-black room for two hours until the screen has dried completely. Make sure to leave some kind of layer underneath it in case some of the emulsion drips.
- Exposing the Image
Now it’s time to burn the image into the screen. In the dark room, lay down a black surface such as a bin bag or cloth. Next, lay the frame on top of the black surface with the screen side down. Now lay the transparency of your image on the screen where the emulsion is. Hold down the transparency using some tape or lay a piece of clean glass over it. Now you’ll want to move the lamp over the screen and turn it on, leaving it in the room for around 20 minutes.
Once the 30 minutes is over, turn off the lamp and carefully remove the transparency with your image on it. You should see faint lines where the image has now burned into the screen. If it doesn’t look right, then you’ll need to leave it for a bit longer.
- Cleaning the Screen
Clean off the screen using some water. A great way to do this is to simply use a showerhead. The area where your image was should now start to flake off, revealing your design with no photo emulsion. After the screen has dried, use some tape to cover up exposed areas on the screen where there is no emulsion. This will prevent the ink from leaking through areas that you don’t want to print.
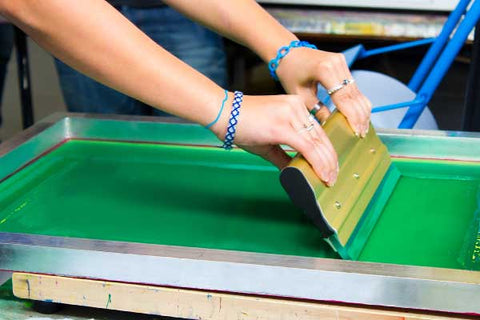
- Print Your Design
Now it’s time to print. Whether your item is a backpack, drawstring bag or a plain shirt, make sure you lay it as flat as possible with a protective layer underneath it. Use the cardboard or some kind of insert and place it underneath the layer that you will be printing on. For example, if you’re printing on a shirt, a piece of cardboard should be placed in the shirt to prevent ink from leaking to the other side.
Once the item is flat, place the screen over the area and secure it in place. Place the ink at the top of the screen and spread it horizontally. Next, use the squeegee to push the ink down onto the screen and pull it towards you. This should transfer the ink over the transparent area of the screen onto your item. Do this several times to ensure an even coat.
- Finish the Item
Once the printing is finished, leave the design for a few seconds and then use heat to set the ink. You can use a hairdryer, iron or even a shirt press if you have one.
We hope that this simple guide to DIY screen printing at home was insightful and helped you understand the process. Starting out with a high-quality blank item will always lead to the best results, so don’t hesitate to get in touch with usregarding our products that can be purchased in bulk to supply your business or design hobby.
Description
Promotional Bags Tips & Resources
-
")
How to Choose the Right Printing Method for Your Custom Bags (Screen Print vs DTF vs Embroidery)
Feb 20, 2026When ordering custom tote bags, backpacks, or promotional bags, one of the most important decisions
Description
-

Cotton Bags With Your Logo Printed: The Smart, Eco-Friendly Way to Promote Your Brand
Feb 04, 2026Looking for a practical promo item people actually keep and reuse? Cotton bags with logo printing a
Description
-

Conference Bags, Apparel & Hats With Your Logo: A Complete Branding Guide for Events
Jan 29, 2026Planning a conference, convention, or trade show? The right branded swag can turn attendees into wa
Description
- Read more articles